
When spring rolled around this year and it got to be time to turn on the ol’ sprinkler system, I started thinking back to how annoying it was the year before trying to guess at just the right amount of water for both the lawn and garden (I have a zone dedicated to the veggie garden). I didn’t want to over water, but wanted to make sure that the lawn didn’t go brown either. That got me thinking about what a PITA it is to program my current RainBird controller. Remembering what was set in multiple programs, spinning knobs, resetting seasonal adjustments from last fall, etc., etc., so I went looking for a smarter solution. I had some pretty basic requirements:
- It should be easy to set up and monitor from the web. If that was just on my internal network cool, if I could punch a hole in my firewall and get to it from the outside world, even better.
- It should take care of itself. I don’t want something that I have to babysit. If I change my wi-fi password, and forget about the box in the basement, it should still keep my lawn alive.
- It should use less water than my current system, because, hey, that’s the whole point here. I’d envision this looking at some weather service and using some algorithm to figure out that if it’s cool and cloudy today with a 90% chance of rain at 8 AM, it probably shouldn’t run the sprinklers at 6 AM.
First stop a search for “Smart Irrigation” on Amazon. Turns out a bunch of people were just as frustrated as me with the current set controllers, and lots of companies have come up with solutions. These generally fell into 3 categories:
- Systems where the controller talks to the company’s server in the cloud, and your phone talks to the cloud based server. These were automatically out, since I don’t want to rely on the company still being in business 5-10 years from now or them starting to charge for the service.
- Systems that connect to the internet and pull down some weather data, and make a decision about whether and how much to water, but still need to be programmed through a clunky UI on the box itself.
- Systems that connect to the internet, pull down weather data, and provide a web based UI for both monitoring and configuration.
Option 3 seemed to fit the bill, but the devices I looked at were anywhere from $200 – $400, which put it pretty firmly in the nice-to-have-but-not-worth-it bucket. After some google searching, I discovered there was an alternative however: OpenSprinkler.
OpenSprinkler is an open source project with an easy to use UI, ability to connect to Weather Underground for weather data, and they sell an 8 zone controller for $150. But, there’s still a problem: I have 11 zones. Good news! OpenSprinkler has an expansion board to upgrade to 16 zones! Bad news: It’s an extra $55, so I’m right back up to the $200 mark.
Back to google, and I come across the TIAO SmartSprinkler controller. $60, 16 zones and it runs OpenSprinkler. It doesn’t come with a case, but that’s OK, you can buy a box for about $10-$15, and so for a total of about $75, I’m in business with what looks like the best software I’ve seen for an irrigation controller, it meets all my requirements, and I get an excuse to pull out my drill and screwdrivers. So I place the order…
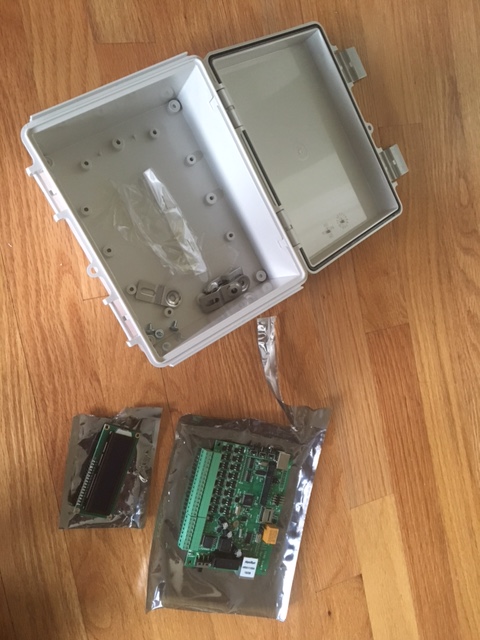
A couple days later, the SmartSprinkler arrives, the next day, the box I ordered from Amazon (BUD Industries NBF-32012) shows up too:
I patiently waited for the weekend when I’d have time to set it all up.
Step 1: Connect the LCD which was in a separate static bag to the main board. This is as easy as lining up the headers and pushing. The header holds it securely with no need for screws. Less than a minute’s work.
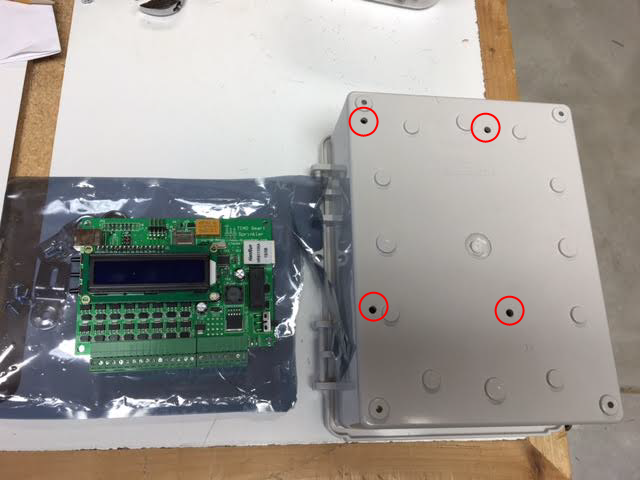
Step 2: measure out the mounting holes and drill them in the box. The board layout is here, but I ended up just holding the board itself up and using a pencil to mark the holes. Next I drilled a 1” hold in the side for all of the wiring (LAN, power, and sprinkler valves). My controller is inside, so I didn’t care about the weather tightness of the box, so I went right through the back of the box. About 15 minutes work.
Step 3: Mount the box. Before removing the old box, I took notes on the wire colors and which zone they were mapped too. Since I also had a phone with me, I snapped a picture too, as a backup:
After that, it was just a matter of unscrewing wires, removing the old box, and putting the new box with the fancy new SmartSprinkler board back in its place.
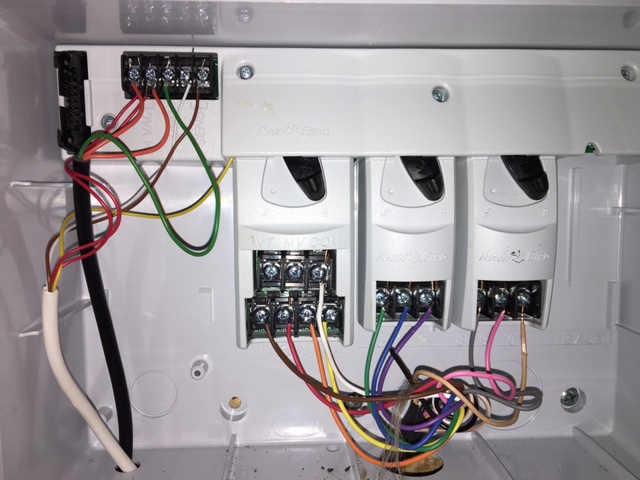
Step 4: Wiring up the new controller. I happened to have a TP-Link range extender kicking around, so that would get me onto my WI-FI, since I didn’t have a LAN drop close to the controller. It’s pretty slow as an extender, but for this, it should be perfect. So I ran the LAN, 24v power from the old controller, and valve control wires into the box. Wiring is really simple, but the power & valve connectors are small, and require a flat blade jeweler’s screwdriver. Fortunately I had one handy. If you don’t a $1 eye glass repair kit screwdriver would probably work fine.
While un-wiring the old box, I noticed that the rain sensor I thought was integral to the RainBird controller was actually a separate unit. The SmartSprinkler has terminals for a rain sensor, so what the heck, I wired it up as well. Total time to unwire, swap boxes and rewire… about 20 minutes.
Now it’s time to get to the good stuff:
Step 5: Power up. I turned on the power strip which has both the old RainBird power supply plugged in as well as the TP-Link. Then I flipped the power switch on the SmartSprinkler. It started exactly as you’d hope. It came up, retrieved an IP address, and immediately synced to a time server to get the current date and time. Pretty good for a project that’s labeled as “DIY”.
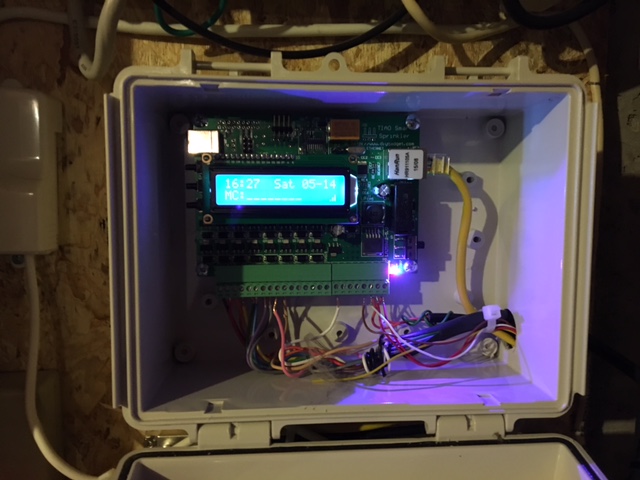
Step 6: Connecting and configuring. The SmartSprinkler has 3 buttons. The middle button shows you the devices IP address. This was all I really needed. I punched the IP address into my iPhone since I had it with me, and boom, I’m in! The SmartSprinkler came pre-installed with OpenSprinkler, and from here it was easy as could be. I named my zones, set the run times to be the same as my old system.
The next step was the only one that required any type of complexity. In order for the controller to talk to the WeatherUnderground API, you need to provide an API key. Turns out that’s was pretty easy. A quick search for “Weather Underground API” reveals that you have to provide your name and purpose for the key, and you’re done. Two minutes later I had an email with a link to my key. I put it into the SmartSprinkler UI, and suddenly I have the current weather showing up, nice.
Next I wanted to validate my wiring, and that the controller really works as advertised. On the old sprinkler, thiw would involve spinning knows, and pushing buttons to set up a “test run” where each zone would run for 2 minutes, then walking around the yard waiting for each zone to cycle through. Since this thing is Wi-Fi enabled, I went outside, opened the website, and told the front lawn zone to run for 10 seconds. Sure enough, as soon as I hit the button, the sprinkler heads popped up, and 10 seconds later, the zone turned off. I walked around and tested the rest of the zones, and all was good. Turns out I know how to un-screw and reattach wires.
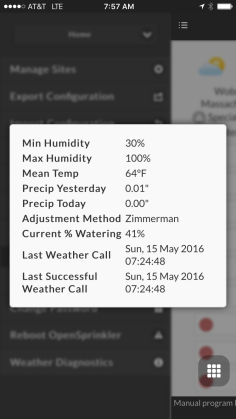
Update: I’ve been running the new controller for a week now, and continue to be impressed. Not only has it worked exactly as expected, but it’s been cool and cloudy the past few days, and it reports that it reduced the watering level to 41% of the program to adjust for that:
Perfect, for an hour of my time, and $75, this device has accomplished all 3 of my goals. It’s much easier to program, takes care of itself, and is using water more intelligently. In summary, I really can’t recommend the SmartSprinkler enough. Go get one, and while you’re waiting, read through their wiki.

Hi John
That is a nice setup. I am considering setting up one up myself. I live in Cape Town.
Just one question. How do you power up your weepoint engine as per your schedules.
Regards
Graven
LikeLike
Hi Can you comment about firmware updates? I cannot find any info on how to do a firmware update. It looks like the newest version is 2.1.6. Thank you bhoth
LikeLike
Hi Brian,
It runs the OpenSprinkler sofware. Instructions for updating the firmware are here: https://opensprinkler.freshdesk.com/support/solutions/articles/5000381694-video-update-opensprinkler-firmware. If you’re running 2.1.6, you’re up to date!
John
LikeLike
I have been running the Irrigation Caddy for the last 4 years but the support on it seems to have died and it’s sum what buggy so I just ordered this TIAO controller today.
LikeLike
I’ve been really happy with it. Very easy to program and use and 100% reliable.
LikeLike
Awesome, would you mind taking this offline and send me an email at bhoth@comcast.net
LikeLike
Hi John
That is a nice setup. I am considering setting up one up myself. I live in Cape Town.
Just one question. How do you power up your wellpoint engine as per your schedules.
Regards
Graven
LikeLike